It seems there has been a rise in popularity for the entertainer’s tried-and-true go-to: the charcuterie board. Maybe it’s because when done well, a charcuterie board is something of a work of art and an “Instagram-able moment.” Or maybe it’s because it’s a simple way to feed a large crowd. Either way, an abundant tray of meat, cheese, vegetables, and fruit is a beautiful accompaniment to your next backyard barbecue or upscale soirée. No matter the season, charcuterie boards are in, but let’s discuss how to make the best summer charcuterie board.
Today I’m showing you how to build a more traditional summer charcuterie board. I am also obsessed with the trendy “grazing boards” that are making the rounds on food and entertaining blogs — breakfast boards filled with pancakes and all the toppings, holiday-themed boards with food in their corresponding colors, and movie night snack boards with popcorn and candy, just to name a few. The possibilities are truly endless and totally customizable to your event.
There are several key principles to follow to be sure your platter looks festive and is easy for guests to help themselves. The first, and most important, is to buy quality ingredients. Keep in mind the overall design of the platter as you build groupings and arrange food by color.
My Favorite Places to Buy Gourmet Food Locally:
- Little Gourmand on Bandywood Dr.
- Sperry’s Mercantile on Harding Pike
- Herban Market in Franklin
- Nashville Farmer’s Market on Rosa L. Parks Blvd.
- Fresh Market on Franklin Rd. (One is coming to Charlotte!)
- Whole Foods in Green Hills or Cool Springs

How to Make A Summer Charcuterie Board
Here is a step-by-step guide to follow when creating your own summer charcuterie board:
STEP 1: MAD PLATTER
Choose a platter or wooden board that is flat and large enough to hold everything without crowding. If you’re going to be moving the platter during the party (say carrying it outside to guests), choose something with sides to prevent anything from rolling off. I like to put down a piece of wax paper to protect my board from staining or scratches.
My Favorite Places to Find Decorative Boards Locally:
- AshBlue on Bandywood Dr.
- Color on Crestmoor Rd.
- The Registry in Franklin
- Vignette Boutique in Brentwood
- Hester & Cook on White Bridge Rd.
- Oak & Willow on Hillsboro Pike
STEP 2: ARRANGE
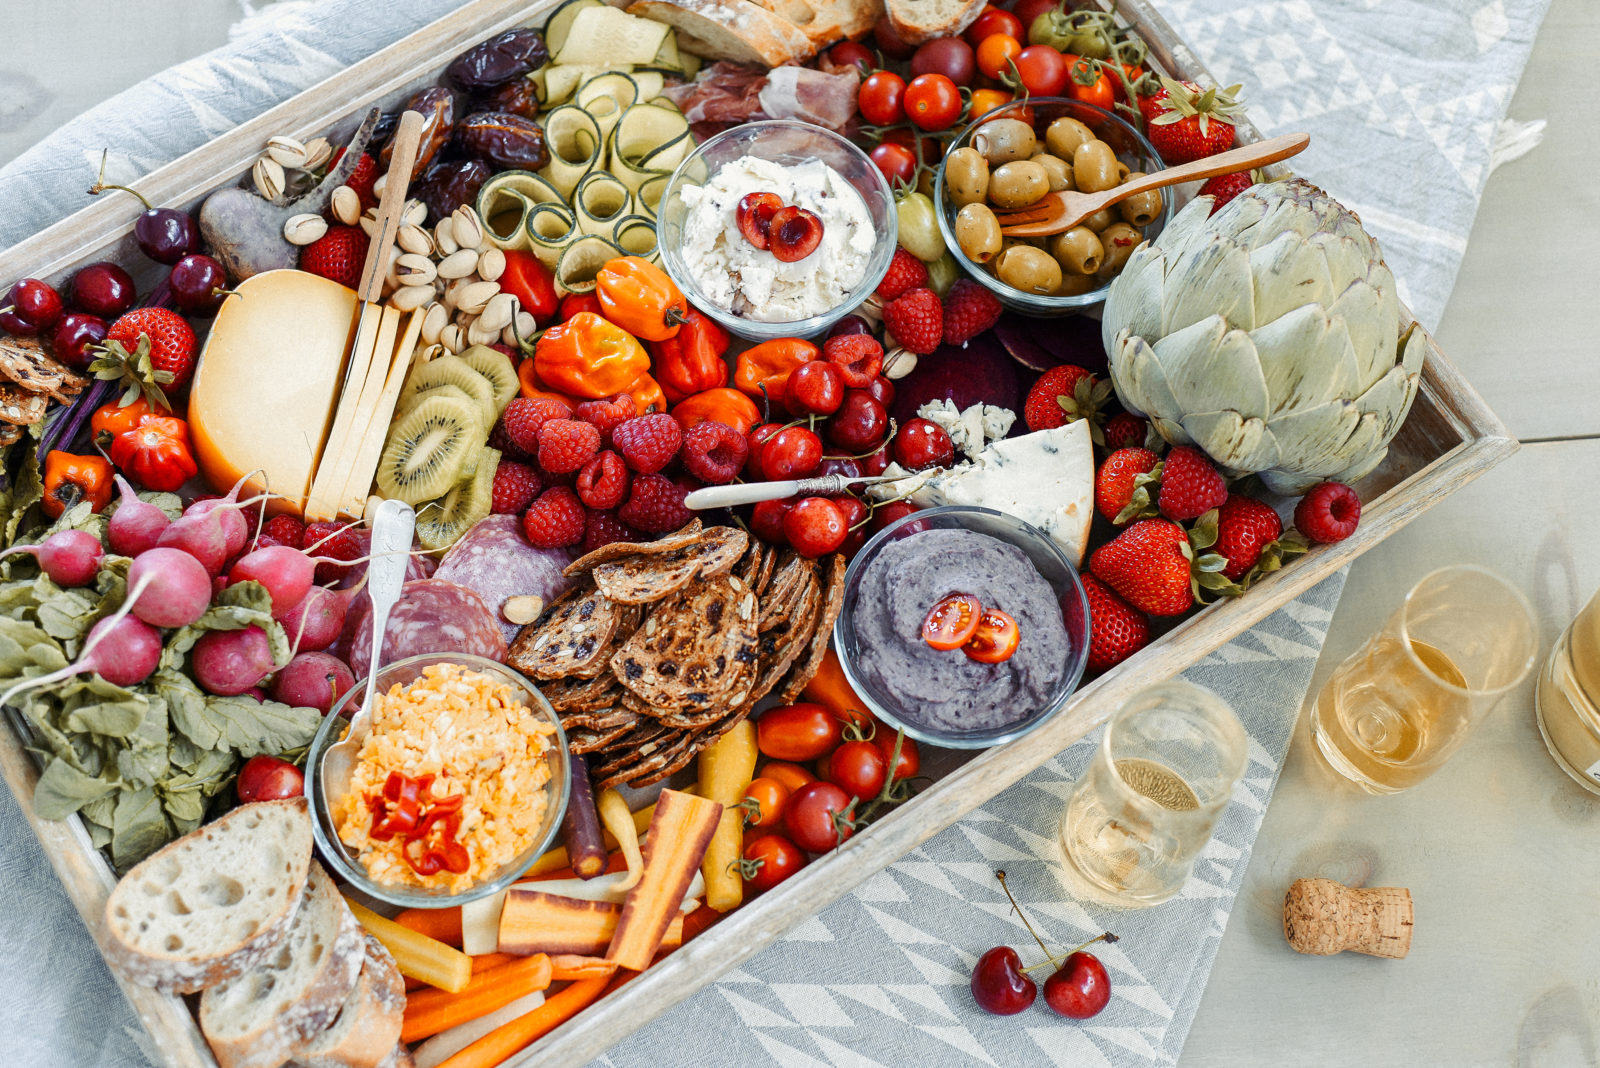
Arrange three to four different types of cheeses on your charcuterie board. When selecting cheese, look for an interesting mix of flavors, textures, and colors with an assortment of hard sharp cheeses, soft creamy ones, and pungent blue cheeses. Next, add a selection of natural deli meats—maybe pepperoni, salami, and prosciutto.
STEP 3: SPREAD IT
Now is the time to add any dips or spreads: hummus, pimento cheese, ricotta cheese. I also like to add a couple of fresh, larger details to help anchor the platter. A large cluster of grapes, a bunch of radishes, and/or an artichoke does the trick.
STEP 4: FILL IN THE BLANKS
Add in plenty of fresh vegetables. Choose things that are seasonal and colorful and cut them into easy to pick-up bites. This is where I rarely have a plan and simply walk into the grocery or farmer’s market and just buy what is fresh and beautiful. Summer is when vegetables are in abundance so take advantage by grabbing things like carrots, cucumbers, tomatoes, peppers, beets, and radishes. Fill in with plenty of crackers and fresh bread.
STEP 5: ADD SOME COLOR
Finally, get carried away with fruit. I like to add fruit last because small berries are easy to help fill in holes and add incredible pops of color. Raspberries, cherries, strawberries, blackberries, blueberries, and kiwi are summertime favorites. Some dried fruit (apricots and dates), olives, and nuts (pistachios and almonds) add a variety of texture.